Ponds 102 Chapter 9
Measure the Pond Liner and Underlayment
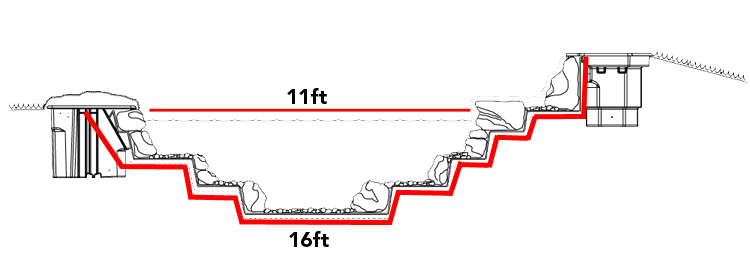
When you have a final drawing that you’re willing to stick to, and you want to know how much liner you’ll need, start by drawing a line along the longest axis of the pond, including the coping stones, and measure that length. Next, figure the liner needed for the steps by multiplying the maximum depth of the pond by 2 and adding that to the length. For the width, draw a second line across the pond at right angles to the first at the pond’s widest point, again remembering to start from the outside of the coping stones. Measure the distance plus double the maximum depth again. Now you have to add a couple of feet to both length and width to compensate for wrinkles and bends and to leave sufficient liner to pull up all the way around the outside edge, to be absolutely sure the liner is large enough to cover the pond in the drawing you made. Finally, round up to the nearest multiple of 5’, since that’s how liner is usually cut, and put the numbers in size order. For example, if your pond measures 15’ x 10’ and there are three 12” steps down to the final depth of 3’, you’ll need a liner that’s [15+ (3x2) +2] by [10+(3x2)+2], 23’x18’, so you’ll purchase a 20’x25’ liner. The amount of underlayment you need will equal the area of the liner you’re using; a 20’x25’ liner will need 500 square feet of underlayment.

If you’ve designed your pond with a waterfall right next to the pond, you might want to set the waterfall so it uses the extra liner of one of the corners of the rectangular sheet of liner. If you’re planning a larger waterfall, you can add in the height of the waterfall to your depth make sure your single piece of liner is long enough to reach the top, or use a separate piece of liner, carefully overlapping the pond liner vertically to avoid leaks. More is better than not enough, you’ll use the trimmings to pad the larger stones you’ll be placing.
When you have a final drawing that you’re willing to stick to, and you want to know how much liner you’ll need, start by drawing a line along the longest axis of the pond, including the coping stones, and measure that length. Next, figure the liner needed for the steps by multiplying the maximum depth of the pond by 2 and adding that to the length. For the width, draw a second line across the pond at right angles to the first at the pond’s widest point, again remembering to start from the outside of the coping stones. Measure the distance plus double the maximum depth again. Now you have to add a couple of feet to both length and width to compensate for wrinkles and bends and to leave sufficient liner to pull up all the way around the outside edge, to be absolutely sure the liner is large enough to cover the pond in the drawing you made. Finally, round up to the nearest multiple of 5’, since that’s how liner is usually cut, and put the numbers in size order. For example, if your pond measures 15’ x 10’ and there are three 12” steps down to the final depth of 3’, you’ll need a liner that’s [15+ (3x2) +2] by [10+(3x2)+2], 23’x18’, so you’ll purchase a 20’x25’ liner. The amount of underlayment you need will equal the area of the liner you’re using; a 20’x25’ liner will need 500 square feet of underlayment.

If you’ve designed your pond with a waterfall right next to the pond, you might want to set the waterfall so it uses the extra liner of one of the corners of the rectangular sheet of liner. If you’re planning a larger waterfall, you can add in the height of the waterfall to your depth make sure your single piece of liner is long enough to reach the top, or use a separate piece of liner, carefully overlapping the pond liner vertically to avoid leaks. More is better than not enough, you’ll use the trimmings to pad the larger stones you’ll be placing.


